I CT for:

Sunday, August 22, 2010

Supplies needed:
I used Unlikely Ballad Scrapkit by Polka Dot Scraps which you can get ~>http://polkadotscraps.blogspot.com/
I am using Big Girl Template by Cakes. You can find this here ~>http://crazycakesscraps.blogspot.com/2010/04/big-girl-template.html
Tube of Choice
I am using the artwork of Elias Chatzoudis. You must purchase a license to use this art. You may do so at MPT~> url=http://www.mypsptubes.com
- Lets get started -
Open your template and delete Raster 1 (credit layer)
Open paper 11 and resize by 80%. Copy and paste above rectangle layer.
On rectangle layer select all, float, defloat, invert...reselect paper layer and delete
Open paper 1 and resize by 80%. Copy and paste above bottom circle layer.
On bottom circle layer select all, float, defloat, invert...reselect paper layer and delete
Open paper 2 and resize by 80%. Copy and paste above top circle layer,mirror paper then flip it so design is on the circle.
On top circle layer select all, float, defloat, invert...reselect paper layer and delete
Open paper 4 resize by 80%. Copy and paste above both square layers.
Using the magic wand select both square layers (you must make each layer active when you want to select it and hold down shift to select the 2nd layer) invert then delete paper layer
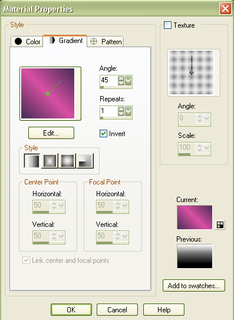
Make your foreground color #d84fa2 and your background color #442e54
Select top wordart layer. Select all, float, defloat. Add a new Raster layer and flood fill with foreground color. Select none and delete original layer.
Repeat above step on the other 2 wordart layers but on the 2nd wordart layer use your background color instead of your foreground color...see my example if you are confused
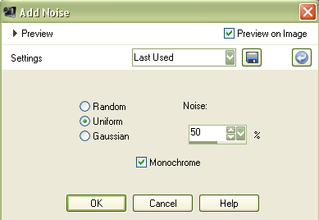
On all my wordart layers I added noise using the settings below
Select your wordart that says "Big girl Panties"...select all, float, defloat and expand by 1. Add a new layer and flood fill with white and move below wordart layer and merge them together
Make a gradient using your foreground and background colors. Below are the settings I used for mine
Select frame layer....select all, float, defloat. Add a new layer and flood fill with your gradient and select none. Add the same noise settings we used except change to random instead of uniform.
Open your tube and place behind frame and position to the left side of frame, duplicate and mirror tube.
Using magic wand select inside of frame, expand by 4, invert and hit delete on both tube layers.
Move duplicate tube layer below your original tube layer. On the duplicate layer add a gaussin blur of 2. Change blend mode to Luminance(L)
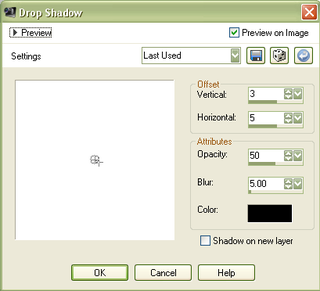
On original tube layer change blend mode to Luminance(L) and also add a dropshadow using the settings I used below
Open element 7 and add as bottom layer and center it
Open element 19 and resize by 70%. Place on top of wire element and position at top left of tag (see my example) duplicate, mirror and flip
Add the correct copyright for the artist you used
Add your name in font of your choice.
Crop and resize if you would like to do so.
Save your tag!
Done!
Subscribe to:
Post Comments (Atom)
Creative Misfits

Friend's Blinkies


0 comments:
Post a Comment