I CT for:

Sunday, August 22, 2010

This tutorial was written for those that have a working knowledge of PSP
Supplies needed:
I used Fantasy Scrapkit by Polka Dot Scraps which you can get ~>http://polkadotscraps.blogspot.com/
I am using template 312 by Missy. You can find this here ~>http://divineintentionz.blogspot.com/2009/12/new-tag-template-312-happy-new-year.html?zx=2b2f9f7c59f25712
I am using Mask 40 by Aqua. You can find this here
~>http://creativemisfitscreations.blogspot.com/2009/12/new-masks_15.html
Tube of Choice
I am using the artwork of Elias Chatzoudis. You must purchase a license to use this art. You may do so at MPT~> url=http://www.mypsptubes.com
Filters I used
3D Shadow by Lokas Software
Dropshadow included with program
Gaussian Blur included with program
- Lets get started -
Open your template and delete the copyright layer. Change canvas size to 800x800 you can crop and resize this later when you are done with your tag.
Open paper 8 and copy/paste as a new layer above the black circle layer. On black circle layer select all-float-defloat-invert then reselect your paper layer and hit delete on it. Also delete your original black circle layer
Open paper 7 and copy/paste as a new layer above the circle1 layer. On circle1 layer select all-float-defloat-invert then reselect your paper layer and hit delete on it. Also delete your original circle1 layer
Open paper 7 and copy/paste as a new layer above the background frame layer. On background frame layer select all-float-defloat-invert then reselect your paper layer and hit delete on it. Also delete your original background frame layer
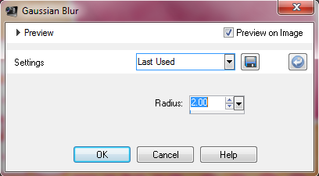
I added a gaussin blur to this layer with the settings below
Open paper 3 and copy/paste as a new layer above the wordart layer. On wordart layer select all-float-defloat-invert then reselect your paper layer and hit delete on it and change your blend mode to Color (L)
Open paper 3 and copy/paste as a new layer above the small stars layer. On small stars layer select all-float-defloat-invert then reselect your paper layer and hit delete on it and change your blend mode to Color (L)
Open paper 3 and copy/paste as a new layer above the copy of small stars layer. On copy of small stars layer select all-float-defloat-invert then reselect your paper layer and hit delete on it and change your blend mode to Color (L)
Open paper 3 and copy/paste as a new layer above the dotted line layer. On dotted line layer select all-float-defloat-invert then reselect your paper layer and hit delete on it and change your blend mode to Color (L)
I cropped to canvas size to get rid of excess paper which can cause shadow lines on your finished tag
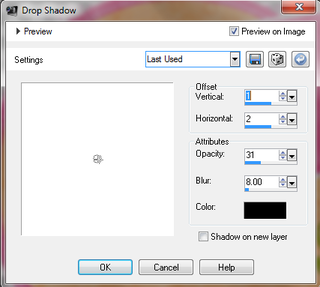
I added a dropshadow on every layer except for the orange circle and pink framed background layer using the settings below
Open paper 12 and copy/paste as a new layer above the background layer. Open your mask and apply a new mask layer to this layer. Merge group and resize/position so that your mask centers behind your tag (see mine for example if needed)
Copy and paste your tube (preferably a close up of face if your tube comes with one)above the frame background layer. On the frame background layer select all-float-defloat-invert then reselect your tube layer and hit delete on it and change your blend mode to Luminance
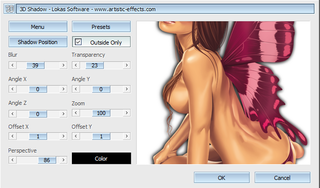
Add your full tube as your top layer of template. I positioned mine to the side of my tag and added a 3D dropshadow using the settings below
Add elements of your choice I used
element 36-pink ribbon
element 10-pink bubbles
element 46-sparkles
Add the correct copyright for the artist you used
Add your name in font of your choice.
Crop and resize if you would like to do so.
Save your tag!

Supplies needed:
I used Unlikely Ballad Scrapkit by Polka Dot Scraps which you can get ~>http://polkadotscraps.blogspot.com/
I am using Big Girl Template by Cakes. You can find this here ~>http://crazycakesscraps.blogspot.com/2010/04/big-girl-template.html
Tube of Choice
I am using the artwork of Elias Chatzoudis. You must purchase a license to use this art. You may do so at MPT~> url=http://www.mypsptubes.com
- Lets get started -
Open your template and delete Raster 1 (credit layer)
Open paper 11 and resize by 80%. Copy and paste above rectangle layer.
On rectangle layer select all, float, defloat, invert...reselect paper layer and delete
Open paper 1 and resize by 80%. Copy and paste above bottom circle layer.
On bottom circle layer select all, float, defloat, invert...reselect paper layer and delete
Open paper 2 and resize by 80%. Copy and paste above top circle layer,mirror paper then flip it so design is on the circle.
On top circle layer select all, float, defloat, invert...reselect paper layer and delete
Open paper 4 resize by 80%. Copy and paste above both square layers.
Using the magic wand select both square layers (you must make each layer active when you want to select it and hold down shift to select the 2nd layer) invert then delete paper layer
Make your foreground color #d84fa2 and your background color #442e54
Select top wordart layer. Select all, float, defloat. Add a new Raster layer and flood fill with foreground color. Select none and delete original layer.
Repeat above step on the other 2 wordart layers but on the 2nd wordart layer use your background color instead of your foreground color...see my example if you are confused
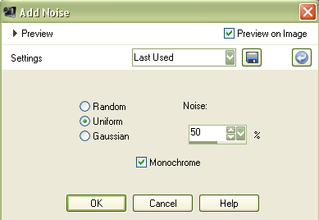
On all my wordart layers I added noise using the settings below
Select your wordart that says "Big girl Panties"...select all, float, defloat and expand by 1. Add a new layer and flood fill with white and move below wordart layer and merge them together
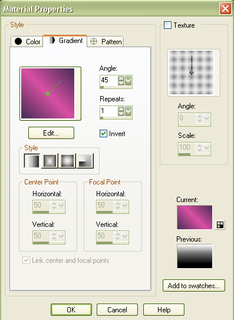
Make a gradient using your foreground and background colors. Below are the settings I used for mine
Select frame layer....select all, float, defloat. Add a new layer and flood fill with your gradient and select none. Add the same noise settings we used except change to random instead of uniform.
Open your tube and place behind frame and position to the left side of frame, duplicate and mirror tube.
Using magic wand select inside of frame, expand by 4, invert and hit delete on both tube layers.
Move duplicate tube layer below your original tube layer. On the duplicate layer add a gaussin blur of 2. Change blend mode to Luminance(L)
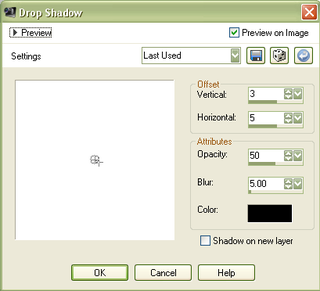
On original tube layer change blend mode to Luminance(L) and also add a dropshadow using the settings I used below
Open element 7 and add as bottom layer and center it
Open element 19 and resize by 70%. Place on top of wire element and position at top left of tag (see my example) duplicate, mirror and flip
Add the correct copyright for the artist you used
Add your name in font of your choice.
Crop and resize if you would like to do so.
Save your tag!
Done!

Supplies needed:
I used Sweet Dream or Beautiful Nightmare Scrapkit by Polka Dot Scraps which you can
get ~>http://polkadotscraps.blogspot.com/
Font of your Choice- Copperplate Gothic Bold
Tube of Choice
I am using the artwork of Elias Chatzoudis. You must purchase a license to use this art. You may do so at MPT~> url=http://www.mypsptubes.com
- Lets get started -
Open frame 1, change canvsas size to 850x550. You can crop and resize when you are done.
Using magic wand select inside both sides of your frame, expand by 3, invert.
Open paper 8 copy and paste as a new layer, hit delete and select none. Move this layer beneath your frame
Dropshadow your frame. I used a dropshadow of 1, 1, 30, 4
Add your tube below the frame layer and place to your liking. Duplicate tube and mirror. Fiddle with the tube until you have the placement that you want Select paper, float, defloat, invert. Select each tube layer and delete excess tube.
Duplicate your tubes. On the original tube layers change your blend mode to Luminance (L) and on the duplicate layers change blend mode to Overlay
Close off frame layer so only the tubes and paper are visible and then merge visible. Unhide frame layer
Open element 18 and copy and paste behind paper/tube layer. place to your liking then duplicate and mirror
Open frame 2 copy and paste as bottom layer and center
Add your name in font of your choice. I used Copperplate Gothic Bold
Add the correct copyright for the artist you used
Crop and resize if you would like to do so.
Save your tag!
Done!

Supplies needed:
I used Spring has Sprung Scrapkit by Gemini Creationz which you can see here
~> http://geminicreationz-byvickig.blogspot.com/ and purchase here ~>http://www.geminicreationzs.com/Shop
I used Floral Mask by Vicky which you can get on the Creative Misfit Blog here
~>http://creativemisfitscreations.blogspot.com/2009/12/new-masks-floral-masks.html
Font of your Choice- I am using Script MT Bold
I have provided a wordart which you can download here ~> http://www.box.net/shared/ohdqe0pdsl
I am using a tube provided with scrapkit. Credits for the tube are include in the kits Tou folder
Filters I used
MuRa's Meister Copies
- Lets get started -
Open a new 700 x 700 image. You can crop and resize later.
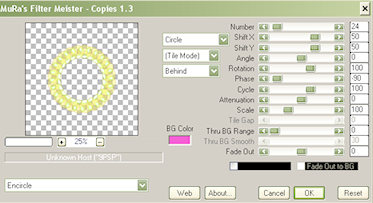
Open bubble 1 (yellow one) and resize by 35 %. Apply MuRa's Meister Copies with the settings shown in screen shot below
Using magic wand select inside of your frame, expand by 1, invert. Open paper 12 resize to 600 pixels, copy and paste as a new layer, hit delete and select none. Move this layer beneath your frame
Open the lilyofthevalley element and resize by 75% and place on top of your frame on the right side. I applied a dropshadow of 1, 1, 35, 3(see my tag for placement if needed)
Open SeasonsFae- Summer and resize by 80%. Place on the left side of frame.(see my tag for placement if needed)
Open paper 15 and paste behind yellow frame. Using magic wand select inside the frame, expand by 1, and delete white paper and select none. Reselect the yellow frame and click on each bubble with the magic wand until each is selected. Once all selected invert and click on white paper again and hit delete. Merge frame and white paper together and select none.
Open and paste paper 2 and place as your bottom layer. Open your floral mask 2 and apply it as a new mask layer. Merge group and center behind frame
Open floral circle and resize by 70%. Copy and paste on top of the frame background layer.
Place the wordart I have provided and either use my tag as a guide to place it or place it as you would like.
Add your name in font of your choice.
Add the correct copyright for the artist you used
Crop and resize if you would like to do so.
Save your tag!
Done!
Welcome to my new tut and tag blog. I am in the process of moving all my tuts over and will soon start posting tags made from my tuts also so if you do my tut I would love to see the results and be able to share them on here. You can contact me through my email: tristensmommy_07@yahoo.com
Thank you
Jenn
Thank you
Jenn
Subscribe to:
Comments (Atom)
Creative Misfits

Friend's Blinkies


