I CT for:

Sunday, August 22, 2010

Supplies needed:
I used Spring has Sprung Scrapkit by Gemini Creationz which you can see here
~> http://geminicreationz-byvickig.blogspot.com/ and purchase here ~>http://www.geminicreationzs.com/Shop
I used Floral Mask by Vicky which you can get on the Creative Misfit Blog here
~>http://creativemisfitscreations.blogspot.com/2009/12/new-masks-floral-masks.html
Font of your Choice- I am using Script MT Bold
I have provided a wordart which you can download here ~> http://www.box.net/shared/ohdqe0pdsl
I am using a tube provided with scrapkit. Credits for the tube are include in the kits Tou folder
Filters I used
MuRa's Meister Copies
- Lets get started -
Open a new 700 x 700 image. You can crop and resize later.
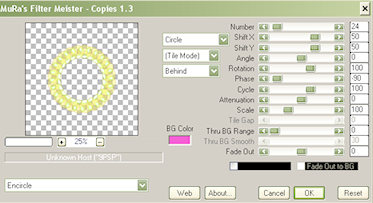
Open bubble 1 (yellow one) and resize by 35 %. Apply MuRa's Meister Copies with the settings shown in screen shot below
Using magic wand select inside of your frame, expand by 1, invert. Open paper 12 resize to 600 pixels, copy and paste as a new layer, hit delete and select none. Move this layer beneath your frame
Open the lilyofthevalley element and resize by 75% and place on top of your frame on the right side. I applied a dropshadow of 1, 1, 35, 3(see my tag for placement if needed)
Open SeasonsFae- Summer and resize by 80%. Place on the left side of frame.(see my tag for placement if needed)
Open paper 15 and paste behind yellow frame. Using magic wand select inside the frame, expand by 1, and delete white paper and select none. Reselect the yellow frame and click on each bubble with the magic wand until each is selected. Once all selected invert and click on white paper again and hit delete. Merge frame and white paper together and select none.
Open and paste paper 2 and place as your bottom layer. Open your floral mask 2 and apply it as a new mask layer. Merge group and center behind frame
Open floral circle and resize by 70%. Copy and paste on top of the frame background layer.
Place the wordart I have provided and either use my tag as a guide to place it or place it as you would like.
Add your name in font of your choice.
Add the correct copyright for the artist you used
Crop and resize if you would like to do so.
Save your tag!
Done!
Subscribe to:
Post Comments (Atom)
Creative Misfits

Friend's Blinkies


0 comments:
Post a Comment